Laser treatment with a pulsed dye laser produces an intense but gentle burst of light that is absorbed by the red colour in blood vessels. It is a safe and effective way to treat vascular lesions and birthmarks.
Your child will need to wear a high factor sunblock for the whole course of the treatment and for a year afterwards as sunlight can darken birthmarks. We will not be able to carry out the laser treatment if your child has a sun tan.
Please tell us if your child has a cold sore as we may have to postpone the laser treatment until it has healed.
What to expect
Each treatment consists of pulses or laser ‘dots’. There may be multiple dots in one treatment session. A local anaesthetic cream may be applied to the skin first to make it numb. Most children will have a ‘test patch’ of laser dots but if the area is very small this might not be necessary. A series of laser treatments may be planned depending on the characteristics of the area to be treated. To protect eyes from the laser beam, the patient and everyone in the treatment room will wear protective goggles or eye shields.
If your child has laser treatment using local anaesthetic they will be able to go home very soon afterwards. If your child has had a general anaesthetic they will need to stay for at least two hours afterwards.
We will take photographs of the area being treated with your consent.
After the treatments
A cold dressing will be applied to the treated area to make it more comfortable.
Your child’s skin may look red, bruised or feel mildly sunburnt for seven to ten days and will need to be looked after.
Please bring some unperfumed moisturiser to apply after laser treatment (Diprobase ointment, Aloe vera gel or Dermamist spray for larger areas).
Gently apply the moisturiser three or four times a day for ten days; please do not rub in.
Any discomfort just after treatment can be relieved by applying an ice pack. Paracetamol can also help.
Your child can have a shower or bath but do not use soap, bubble bath, shampoo or cosmetic camouflage/make up for one week. Allow the treated area to dry naturally or gently pat dry with a soft towel (do not rub).
Your child should avoid PE, games and swimming for three weeks after treatment to prevent damage to the lasered skin.
It is very important not to expose the area to sunlight whilst having laser treatment and for one year after completion of treatments. Your child should use a high factor sun block (35 or higher) at all times in the UK from March to October. If you are visiting a sunny country at any time of the year your child should wear sun block all of the time. If the treated area is on the face then please wear a hat in the sun.
If the area crust, blisters, show signs of infection or develops significant swelling lasting more than 24 hours please contact the nurse specialist. Occasionally an anti-biotic cream or oral anti-inflammatory medication may be required.
Advice following dental surgeryhttps://www.chelwest.nhs.uk/your-visit/patient-leaflets/paediatrics/advice-following-dental-surgeryhttps://www.chelwest.nhs.uk/++resource++plone-logo.svg
Any food or drinks that are very hot, cold, hard or sharp
Mouthwashes or spitting forcefully
Exercise, playing sport or rushing around
Touching or sucking the wound.
These can all cause further bleeding.
We advise a soft diet for the first 28 hours following your child’s dental surgery.
Bleeding
When your child has a tooth removed, he or she is left with a hole (tooth socket) in the jawbone. At first a blood clot forms, before healing over completely.
It is normal to have blood stained saliva for about 24 hours after the tooth (teeth) have been removed.
Encourage your child to rest. They should not rush around, play sports or exercise as this will cause further bleeding.
Do not let your child rinse their mouth, forcefully spit, drink through a straw or consume fizzy and sugary drinks.
Do not let your child press his or her fingers (and tongue where possible) into the tooth socket at any time.
If the tooth socket starts to bleed again, take a piece of gauze, place it over the tooth socket and have your child bite down for at least five minutes. Rest for 10-20 minutes – this should stop the bleeding.
Local anaesthesia
During the dental procedure today your child may have been given an injection of local anaesthetic into the gum, near where the tooth has been removed. This helps to minimise the pain during and after the procedure. The local anaesthetic used causes temporary numbness to the areas inside the mouth.
Take care your child does not bite or chew the cheek, lip or tongue. If a local anaesthetic has been used the numbness should slowly wear off within 2-3 hours.
We advise that your child does not eat and only drinks water during this time.
Pain relief
During the week after dental surgery your child may experience some discomfort, swelling and bruising around the cheeks, jaw and neck.
You may need to give your child pain relief, this can be their usual pain killer. You can buy this at your local pharmacy and follow the instructions on the side of the bottle.
Stitches
Your child may have had stitches (sutures) to close the tooth sockets. These stitches will be dissolvable, (not require removal) unless you are told by the dentist. It takes about two weeks for the stitches to dissolve.
Do not let your child fiddle with the stitches using his or her fingers or tongue.
Oral hygiene
It is important to keep the tooth sockets as clean as possible for the first few weeks after the procedure.
We advised to brush the teeth with a toothbrush and fluoride toothpaste avoiding the surgical extraction site. We recommend starting brushing the teeth as soon as possible and depending on the type of surgery/ extraction site.
We advise the use of mouthwash (salt water or whatever the dentist has advised) for children over the age of five years old that are able to spit; this should only start 24 hours following the surgical procedure. We recommend that until the stitches disappear and your child’s mouth looks and feels healed you continue with the mouth wash.
In case of an emergency
Please seek advice if your child experiences any of the following:
New or increased bleeding
Increasing pain not controlled with regular painkillers
Increased swelling (you should expect there to be some swelling)
If you have any concerns or questions please contact the dental nurses, NHS 111 or your GP.
Diet advice for dental patientshttps://www.chelwest.nhs.uk/your-visit/patient-leaflets/paediatrics/diet-advice-for-dental-patientshttps://www.chelwest.nhs.uk/++resource++plone-logo.svg
Tooth decay is also called dental cavities or dental caries. This is the destruction of the outer surface (enamel) of a tooth and leads to the tooth getting damaged therefore needing fillings or tooth removal.
Decay results from the action of bacteria that live in the plaque. The plaque bacteria sticking to the tooth use the sugar from food particles in the mouth to produce acid that attack the teeth and destroy the enamel.
Diet can affect teeth
Food and drink that contain sugar cause tooth decay. If you control how often you have sugary food and drink then look at how you can lessen the amount it will definitely help with the health of your child’s teeth.
We would recommend looking at your child’s diet and the amount of sugar they eat and how often they have it. Then consider how you can reduce this.
What causes tooth decay?
The main cause of tooth decay is the sugar that is in the food and drinks they have. Every time you eat and drink anything sugary your teeth are under attack from the plaque acids for up to one hour. This is because the sugar mixes with bacteria in the plaque to produce harmful acids.
This is why it is important to keep sugary foods and drinks to mealtimes only. If you are hungry between meals then you should choose foods that are kind to your teeth and do not have added sugar.
Here are some foods that are kind to your teeth:
Fresh fruit
Raw vegetable pieces
Plain popcorn
Cheese
Breadsticks
Plain yogurt
Rice cakes
Unsweetened cereal
Crumpets
Plain bagels
Cheese scones
Nuts (depending on your child’s age)
Can I eat snacks?
It is better to have three or four meals a day and avoid frequent snacking.
If you do need a snack between meals, choose foods that do not contain sugar.
Fruit does contain acids, which can erode your teeth. However, this is only damaging to your teeth if you eat an unusually large amount. Try to limit dried fruit as it is high in sugar and can stick to the teeth. If you do eat fruit as a snack try to eat something alkaline such as cheese afterwards. Savoury snacks are better.
Tips for healthy snacks:
Cheese
Hummus
Raw vegetables
Marmite
Break sticks
Natural plain yogurt
Rice cakes
Savoury sandwiches
Savoury sandwiches include:
Tuna and cucumber
Cheese
Egg and cress
Chicken and sweetcorn
Cold meats
What should I drink?
When you are thirsty plain water and milk are the best drinks for your teeth. Fruit juices you should be given only at mealtimes and add water to them.
Babies and infants
Breastfeeding is great for babies but suckling all night long (especially for infants over 1 year) could be damaging to teeth.
From six months old infants should be introduced to drinking from a cup
It is advised that sugar is not added to weaning foods, this may encourage a sweet tooth and also cause tooth decay.
Remember:
Sugar contains calories only, no vitamins or proteins
Limit the frequency and amount of sugary foods and drink
Water and milk in a cup are the best drinks for teeth.
A day case means that your child will come into hospital on the day of their operation or procedure and will be able to go home on the same day. When you arrive at the hospital, come up to the first floor, by lift or escalator. When having a day case procedure your child will be admitted to one of the following wards:
Saturn Ward, Mercury Ward, Neptune Ward, or Jupiter Ward (Adolescent Unit)- the main day case area is Saturn Ward.
Our young patients are encouraged to spend time in the play room until they go through to the operating theatre or have their operation/procedure. In our play room, we have toys, books and activities for children of all ages. Children must be supervised at all times. Staff will introduce themselves to you and we all wear name badges which show our name and job title.
Day of admission
If your child becomes unwell and develops a temperature before their admission date, please inform us so that we can advise you. If your child’s visit is cancelled because they are unwell you will be sent another date to come in as soon as possible. Remember: you may have fasting instructions for your child. You must follow those instructions or the operation cannot proceed.
Things to bring with you
Medication that your child is taking—give this to the nursing staff when you arrive on the ward.
A favourite toy or comforter, or a quiet game to help distract your child during the day.
An empty beaker or feeding bottle so that they can be given something to drink AFTER the procedure.
Your child’s Health Record Book, i.e. the Red Book.
The name of your GP and health visitor with their full address and contact telephone numbers. A report on a child under five is sent to the health visitor and a report on every child is sent to their GP.
The name of your child’s school and its full postal address. A report on every child of school age is sent to the school nurse.
If applicable your income support book. You will need this if you require financial assistance towards the cost of your travel. Money can be reclaimed from the cashiers situated on the lower ground floor between lift banks C and D, opposite the hospital restaurant.
Loose fitting clothes for the journey home if you think your child will need them.
Valuables
Please do not bring any valuables with you. The hospital does not accept liability for any loss or damage to your personal property. If your child wears jewellery, this should be removed and left at home. Please also remove any nail polish.
Other children/relatives
Please do not bring other family members into hospital with you. We are happy to welcome parents, but there is simply no space for other family members.
Facilities & policies
Eating facilities
During the day you may want a cup of tea, a soft drink or a meal. There are a number of options. There is a restaurant on the lower ground floor of the hospital—take lift bank C, and then go right and right again. There is a coffee shop on the ground floor behind lift bank B. There are also coffee shops and restaurants along the Fulham Road.
After your child’s operation/procedure they will be able to have something to eat and drink, but please wait until you have spoken to a nurse before offering them anything.
Parking facilities
Parents of children being treated at this hospital have a special reduced rate if they wish to use the hospital car park. The car park is situated in the basement. The staff can help you to claim the reduced rate before you leave the unit.
Mobile phones
Please keep your mobile on silent and be considerate about using it in patient areas
No smoking policy
Chelsea and Westminster Hospital operates a strict no smoking policy. Please do not smoke in or around the hospital building.
Going home
The nurse and doctor caring for your child will decide when he/she can go home. This is usually about 2 hours after your child has returned to the ward. The time of discharge will vary from child to child, according to their recovery. You may be given written instructions advising you of any potential problems and who to contact if you have any additional questions once you arrive home. You will also be advised if you need to bring your child to any follow up appointments.
There is no need to force your child to eat, but do encourage them to take some liquid.
What to expect at home
Your child may feel tired for the rest of the day. That is to be expected. They may have some discomfort and/or a slight temperature. An appropriate dose of medication should help minimise pain or make him/her comfortable. Follow the instructions on the medication.
If they are more awake they should still be encouraged to occupy themselves with a quiet activity, e.g. reading or watching television.
Pack a bag with slippers, a dressing gown and things to do to keep your child occupied. Bring your child’s Red Book if you have one.
Your child should wear a loose fitting top. Their hand may be in a bulky dressing after their operation.
Medicines
If you have been given antibiotics or painkillers, please give them to your child as instructed. If your child normally takes any other medications, please give these as per their normal routine unless told otherwise by your doctor.
If applicable, bring your child’s inhaler and any other medications they may normally take on the day.
Childcare
A maximum of two adults will be allowed in the department and one must be the legal guardian to sign consent.
We unfortunately do not have the facilities to look after other siblings. Please find a baby sitter for your other children.
Illness
If your child is unwell with a cough, temperature, vomiting, diarrhoea or any other infectious illness then please contact us for advice.
Please also contact us if you are unable to attend so that your child’s slot can be given to another child.
Details
Please be aware that these admission times are to allow the nursing and anaesthetic staff to carry out the necessary preoperative checks. This is not the time of your child’s operation. This will be decided on the day by the operating surgeon.
Children are usually operated upon in age order unless otherwise dictated by clinical priority. Please be prepared to wait for up to a few hours.
Fasting instructions
If your child is having a general anaesthetic(put to sleep during the procedure):
They must noteat after 2:30am for morning operations or 7:30am for afternoon operations
They may drink water only until 6:30am for morning operations or 11:30am for afternoon operations (not milk)
They must not chew gum or have any other sweets on the day.
If they are having a local anaesthetic(kept awake during the procedure) they may eat and drink as normal before surgery.
General information
Only one parent will be able to accompany their child in to the anaesthetic room until they are put to sleep. After that you will be asked to wait in the parent’s lounge for the duration of the operation.
You will need to stay for approximately two hours after your child’s general anaesthetic until your child is eating and drinking and is comfortable.
You will be advised if you need to come back for an outpatient appointment.
After discharge
Pain relief
It will be helpful to have painkillers at home. Paracetamol and ibuprofen will be suitable for most children. Your doctor can advise you if you are unsure.
Hand elevation
If you have been given a sling, please use it during the day. Your child’s hand should be above the level of their heart. This will reduce swelling and pain.
At night you can remove their hand from the sling. Please rest their hand up on pillows whilst they are lying in bed.
Keep the dressing clean and dry
If your child’s dressing or plaster gets wet or dirty please contact the hospital to ask for advice.
You may need to come in again for a dressing change.
There may be a problem if your child has:
Fingers which are dusky or very pale compared to their other fingers
Pain that is increasing or that is not controlled with painkillers
Their bandage or cast feels too tight because of swelling
There is pus or a smelly discharge coming from their wound
Their plaster gets wet or starts to break
Their hand is bleeding and this doesn’t stop even when you raise their hand above their head and apply firm pressure for five minutes.
Hernias in childrenhttps://www.chelwest.nhs.uk/your-visit/patient-leaflets/paediatrics/hernias-in-childrenhttps://www.chelwest.nhs.uk/++resource++plone-logo.svg
This leaflet explains hernias and what to expect when your child comes to either the Chelsea and Westminster Hospital or West Middlesex University Hospital for their operation.
What is a hernia?
A hernia describes a small piece of abdominal lining, and sometimes a section of the bowel, which bulges out through a weak area in the muscles of the abdominal wall. Both children and adults can have hernias. Sometimes it is present at birth. The hernia can look bigger when your child cries or strains. You may hear your child's hernia referred to as an 'inguinal hernia' or a 'femoral hernia'. These names refer to the exact part of your child's abdomen which have the muscle weakness. Both types of hernia are treated in the same way.
How common are hernias in children?
Hernias are more common in boys than girls. About one in 50 boys will have a hernia during their childhood. The condition is also more common in babies born prematurely.
Is it possible to prevent a hernia?
There is no known way of preventing a hernia.
How is a hernia diagnosed?
Your doctor will be able to diagnose the hernia by clinical examination as it appears as a characteristic lump in your child's abdomen. Your child may not need any further diagnostic investigations.
How are hernias treated?
Your child will need a small operation. In many cases this can be carried out as day surgery - your child will arrive at the hospital, have the operation and be able to go home on the same day. Occasionally a child will need to stay in hospital for two or three days.
What happens before the operation?
You will receive information about how to prepare your child for the operation in your admission letter/email. Your child should not have anything to eat or drink beforehand for the amount of time specified in the letter. It is important to follow these instructions - otherwise your child's operation may need to be delayed or even cancelled.
The day you come to hospital for the operation, your child's surgeon will explain the operation in detail, discuss any worries you may have and ask you to sign a consent form. An anaesthetist will also see you to explain your child's anaesthetic in more detail. If your child has any medical problems, such as allergies, please tell the doctors.
What does the operation involve?
Your child will be given a general anaesthetic and will be asleep during the operation. The surgeon will make a small incision over the bulge in the groin or pass a scope through the tummy button and repair using keyhole surgery instruments. The abdominal lining and piece of bowel will be pushed back into place. If the incision is in the groin a small telescope may be passed through the hernia (laparoscopy or keyhole surgery) in order to identify the presence or absence of another hernia on the other side. This occurs in 1 in 10 children. If this is the case another incision will be made on the opposite side. The muscle wall beneath one/ both groin cuts will be repaired and the cut will be closed with stitches. These stitches will dissolve and will not have to be removed. A glue will be placed over the incision.
Are there any risks?
Every anaesthetic carries a risk of complications, but this is very small. Your child's anaesthetist is an experienced doctor who is trained to deal with any complications. After an anaesthetic, a child sometimes feels sick and vomits, has a headache, sore throat or feels dizzy. These effects are usually short-lived. Any surgery also carries a small risk of infection or bleeding.
What happens afterwards?
After the operation, your child may feel some tenderness and have bruising in the groin area.
If your child feels uncomfortable, a painkiller such as liquid paracetamol will help. It's a good idea for your child to wear loose clothing while the area is sore. Babies can wear nappies as usual. You can give your child a bath two days after the operation. However, avoid long baths until the wound has settled down. Do not use cream around the wound as it may cause irritation.
Your child's surgeon may ask you to come back for an outpatients appointment.
Are there any long term effects of hernia repair?
More than 99% of hernia repair operations are successful. You should see an immediate reduction or the complete disappearance of the hernia.
Information following a caudal blockhttps://www.chelwest.nhs.uk/your-visit/patient-leaflets/paediatrics/information-following-a-caudal-blockhttps://www.chelwest.nhs.uk/++resource++plone-logo.svg
When your child has an operation, the general anaesthetic will make your child unconscious. Pain relief before and during the operation can be provided using pain relieving medicines that will affect the whole body or alternatively by injecting local anaesthetic to numb (block) the area of the operation.
What is a caudal block?
This is an injection of local anaesthetic (numbing agent) into the caudal space, at the base of your child’s spine
It is a good form of pain relief for children who are having operations below the level of their belly button
It provides pain relief both during and after the operation
It may last for up to six hours or more
Your anaesthetist will discuss this with you before your child goes to have their operation
Benefits
Numbing the nerves at the base of the back , means your child will feel little or no pain
Avoids needing to use strong pain relief which have side effects
Reduce sickness and usually decreases recover time after the operation
Complications
Your anaesthetist will discuss these with you before the operation.
Common
Weak / heavy legs
This is the most common side effect and occurs as the block affects the nerves supplying the legs. It is temporaryand strength to the legs will return to normal as the block wears off
Inadequate pain relief
In about 1 in 20 children the block does not work
If this is the case the anaesthetist will give your child other forms of pain relief
Difficulty passing urine
Usually, this is not a problem and patients manage to pass urine when they have had enough fluid to drink
Rarely, a catheter needs to be inserted temporarily into your child’s bladder to empty it
Uncommon
Sedation
This may occur if your child has been given other pain relief along with the local anaesthetic (caudal block).
Itching
This may occur if your child has been given morphine like pain relieving medication in addition to local anaesthetic.
Rare
Nerve damage
This occurs in less than 1 in 10,000 and may be temporary or permanent.
Very rare
The following are very rare recognised complications and checks are taken throughout the process to prevent these
Your child’s anaesthetist will discuss them in more detail
Infection
Haematoma (bruise)
Injection of local anaesthetic in blood / spinal space
Advice at home
It is safe for children to be discharged the same day as having had a caudal block.
Pain relief
It is important to give your child regular mild pain relief (Paracetamol/ Ibuprofen) as advised by your clinician, even if your child is comfortable. This will help as the caudal block starts to wear off and can be gradually reduced in frequency over the next couple of days.
Safety
Key safety information is listed overleaf
Key points
Continue regular mild pain relief at home and decrease slowly.
It may take 12 hours for the normal feeling to return to your child’s legs.
Avoid hot baths / hot water bottles
supervise your child while crawling
Keep child well hydrated
Encourage your child to drink water
Monitor for difficulty passing urine
Inability to pass any urine
Pain in the lower tummy
Bloated lower tummy
If your child has not passed urine in 8-10 hours after the operation or has these problems please contact your GP or go to your local Emergency Department.
Pre-assessment is to ensure your child is fit for their anaesthetic and surgery. It also gives you and your child an opportunity to ask questions about the operation and to discuss what to expect on the day of surgery.
Not all patients require a pre-assessment—you will be notified of the pre-assessment date via letter or phone if it is applicable to your child.
Mastoidectomy advice
Your child is having a mastoidectomy which is an exploration of the ear and removal of any infected material to reduce the risk of possible complications associated with infection.
It is important in the run up to your operation date that your child does not have a cough, cold or any respiratory or throat infections.
Please contact the Paediatric Admissions Team on 020 3315 8018 during working hours if this occurs, as you may to need to have your operation date changed.
Day of admission
If your child is coming at 07:15am:
No food or milk after 02:30am and water only until 05:30am.
If your child is coming at 12pm:
No food or milk after 07:30am and water only until 10:30am.
Your child’s surgery may be delayed or cancelled on the day if the fasting instructions are not followed precisely.
On the day of the operation, a maximum of two adults are permitted to accompany your child—one of whom needs to be a legal guardian to sign consent. Please arrange care for siblings as we cannot accommodate them on the ward.
On arrival, the children’s nurses will prepare your child for surgery by asking if there have been any changes to their health since pre-assessment and to recheck their blood pressure etc. Ametop (local anaesthetic cream) will be applied to both hands.
All care and procedures will be explained to you and your child. You will see the surgeon who will discuss the operation with you and if you have not already done so sign a consent form. The anaesthetist will also meet you and your child.
One parent/guardian may accompany your child to the anaesthetic room.
Car parking
The rates are reduced on the operation day for your child, please ask the nurse looking after your child to arrange this.
After the operation
Initially after the operation your child will go to paediatric recovery. As soon as your child wakes you will be called to recovery. They are then transferred back to the children’s ward where their condition will be monitored and closely observed.
Children can be very miserable after waking and as the anaesthetic wears off, this is normal until your child is fully awake. Your child will be encouraged to eat and drink a normal diet once they are fully awake.
If your child needs to stay overnight, one parent/guardian may accompany him/her.
Discharge home
A mastoidectomy can be a painful procedure. This pain can last for up to two weeks. The pain may get worse before it gets better (usually from days 4–7) and you may find they complain of earache.
Please keep the ear dry until you have had a follow-up appointment with the surgeon.
Avoid sudden head movements
Avoid playing sport and exercise
Avoid straining and lifting heavy weights
Avoid nose blowing.
It is advisable to treat the pain before it builds up—therefore give medicine prescribed regularly for the first week. During the second week give pain relief medicine as required.
We advise you wait 10–14 days before your child returns to school/nursery. This is because they are susceptible to any infection during this time. They need to be kept away from crowds and people with coughs and colds during this time.
If you child becomes unwell or has a high temperature above 37.5°C, please contact your GP. If you have any concerns out of normal working hours, please contact your local A&E Department.
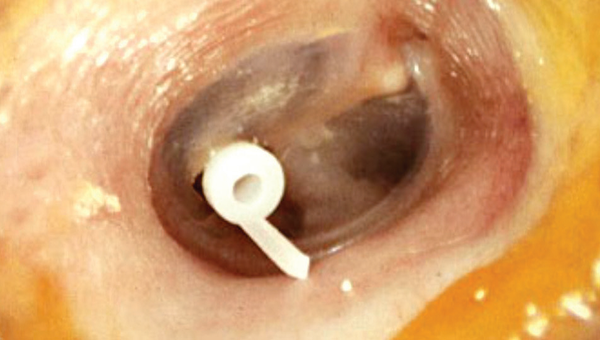
Myringotomy and grommet insertionhttps://www.chelwest.nhs.uk/your-visit/patient-leaflets/paediatrics/myringotomy-and-grommet-insertionhttps://www.chelwest.nhs.uk/++resource++plone-logo.svg
Pre-assessment is to ensure your child is fit for their anaesthetic and surgery. It also gives you and your child an opportunity to ask questions about the operation and to discuss what to expect on the day of surgery.
Not all patients require a pre-assessment—you will be notified of the pre-assessment date via letter or phone if it is applicable to your child.
Myringotomy and grommet insertion advice
Your child is having a myringotomy (a small incision in the eardrum) and insertion of grommets. This is usually recommended because your child has one or a combination of the following symptoms:
Recurrent ear infections
Hearing loss
Persistent glue ear
Day of admission
If your child is coming at 07:15am:
No food or milk after 2:30am and water only until 5:30am
If your child is coming at 12 noon:
No food or milk after 7:30am and water only until 10:30am.
Your child’s surgery may be delayed or cancelled on the day if the fasting instructions are not followed precisely.
On the day of the operation, a maximum of two adults are permitted to accompany your child—one of whom needs to be a legal guardian to sign consent. Please arrange care for siblings as we cannot accommodate them on the ward.
On arrival, the children’s nurses will prepare your child for surgery by asking if there have been any changes to their health since pre-assessment and to recheck their blood pressure etc. Local anaesthetic cream will be applied to both hands.
All care and procedures will be explained to you and your child. You will see the surgeon who will discuss the operation with you and if you have not already done so sign a consent form. The anaesthetist will also meet you and your child.
One parent/carer may accompany your child to the anaesthetic room.
After the operation
Initially after the operation your child will go to paediatric recovery. As soon as your child wakes you will be called to recovery. They are then transferred back to the children’s ward where their condition will be monitored and closely observed.
Children can be very miserable after waking and as the anaesthetic wears off, this is normal until your child is fully awake. Your child will be encouraged to eat and drink a normal diet once they are fully awake.
If your child needs to stay overnight, one parent/guardian may accompany him/her.
Car parking
The rates are reduced on the operation day for your child, please ask the nurse looking after your child to arrange this.
Discharge home
Pain following myringotomy and insertion of grommets is fairly minimal, however if your child does experience any pain or discomfort give paracetamol as instructed on the bottle.
It can be normal to wake up the morning after the operation with a small blood stained discharge coming from the ear. This is due to the incision made when the grommet was inserted. We advise you wait 24–48 hours before your child returns to school/nursery. This is to ensure they have completely recovered from the anaesthetic and they are back to their usual self.
The grommets do not drain fluid from the ear—they equalise the pressure in the middle ear and keep it dry. If fluid does come out of the ear this could mean that your child has an ear infection and you should take your child to your GP for treatment.
The surgeon advises you to protect your child’s ears and keep them dry with ear plugs or cotton wool and Vaseline. They can swim straight after surgery with adequate water precautions.
Follow-up in the audiology clinic, 4–6 weeks after surgery.
Mercury Ward is a 24-bed unit taking both emergency and elective admissions. We care for children and their families ranging from two days old to 16 years of age.
We specialise in gastrointestinal disorders and complex children’s surgery.
We have a large team of nurses, doctors and specialist professionals committed to working with your child and we involve the family as much as possible to cater for all needs.
Nursing and support workers
Mercury Ward has a team of nursing staff and healthcare assistants who will look after your child, led by the ward sister. Day shifts are 8am–8.30pm and night shifts are 8pm–8.30am. You will also meet play specialists, domestic staff and administrative staff.
Medical
Your child’s care will be led by a consultant who has a team of doctors working with them. You will be seen by a consultant within 24 hours of your child’s admission and reviewed by the team on ward rounds daily, approximately from 9am–12 pm. Other specialities, such as surgeons, orthopaedic doctors and physiotherapy teams may visit at different times.
Visiting times
Visiting times are 8am–8pm. However, parents may remain on the ward after this time. We have limited space and in order to remain respectful of other patients we can only have two visitors per bedside at a time.
If you require a side room, this will be for a medical reason and visiting may need to be restricted.
Staying overnight
We recognise the importance of family-centred care and strive to achieve a safe and comforting environment for your child. We therefore welcome one parent/guardian to stay alongside your child overnight and, when possible, we will provide a camp bed. We do ask that these are folded away in the morning by 10am in order to keep a clean and tidy bed space.
Overnight we would like children to have as good a night’s sleep as possible to aid their recovery—we will keep noise to a minimum, but sometimes monitoring and machinery is necessary. Bedside lamps will need to remain on in order to ensure your child can be assessed at all times to maintain their safety.
Parents’ room
Please use this room as a children-free zone where you can help yourself to hot drinks and a bit of space. You are welcome to bring in your own food items or home cooking and use our fridge and microwave. We ask that the area remains as clean and tidy as when you found it so it is ready for the next parent. Please label all food in the fridge with your child’s name and the date, as our cleaning team are vigilant in maintaining a safe food environment—therefore, any unlabelled items will be discarded.
Mealtimes
Breakfast is served from a trolley outside the kitchen. Your child can help them self to toast and cereal. Their nurse will be able to help if needed.
Lunch and supper is chosen from a menu that will be brought round to you each morning so your child can make their own selection.
Breakfast: 07:30–9am
Lunch: 12 noon–1pm
Dinner: 5–6pm
Water jugs are filled and refreshed twice a day. There is also a water fountain and squash available on the ward.
Playroom
We have a playroom which is open from 9am. It is a safe area for children to explore, play and sit at the table for meals with others, if they would like. We also have play specialists who are trained members of the team and can provide distraction techniques during procedures, as well as play sessions one-to-one with your child.
School
If well enough, we expect all young children and adolescents to attend the hospital school, which is on the 1st Floor. If your child cannot attend the school, teachers can bring work to the bedside.
If your child is here for a while, the school will liaise with his/her own school for work to be brought in.
Please note that we inform school nurses of all admissions to hospital.
School times are Monday to Friday 10am–12pm and 1.30–3.30pm.
Televisions
The television service is available free of charge from 7am–7pm. After this time you are able to purchase a TV card from main reception for further viewing.
Please use the provided headphones from 7pm.
Medications
If your child requires any medication for at home your doctor will prescribe it and the pharmacy team will arrange for it to arrive on Mercury ward. At times this process can take a few hours to safely arrange, therefore please be patient and bear in mind your nurse will be following up on progress on your behalf.
Car parking
We provide reduced car parking rates for parents of children who are inpatients—£10 for 24 hours. Please ask your nurse for a voucher which you can hand in at main reception with your car park ticket when you leave.
Feedback
We welcome all feedback and encourage you to complete the children’s survey, which is available from the front desk.
You could also give your feedback verbally to either your nurse directly or the nurse in charge.
Why is hand washing so important on the Neonatal Unit?https://www.chelwest.nhs.uk/your-visit/patient-leaflets/paediatrics/why-is-hand-washing-so-important-on-the-neonatal-unithttps://www.chelwest.nhs.uk/++resource++plone-logo.svg
Epidural analgesia for children and young peoplehttps://www.chelwest.nhs.uk/your-visit/patient-leaflets/paediatrics/epidural-analgesia-for-children-young-peoplehttps://www.chelwest.nhs.uk/++resource++plone-logo.svg
This leaflet aims to provide information for parents of children who may benefit from an epidural for pain relief after surgery. The information in this leaflet will be discussed with you by an anaesthetist, or a member of the pain team.
What is an epidural?
An epidural is a way of giving pain relieving medicine following certain types of surgery.
Whilst your child is asleep the anaesthetist will pass a small plastic tube (the epidural catheter) into the space around the spinal cord in their back. The tube is held in place by a large plastic dressing.
Pain relieving medicine is given continuously through the tube via a pump. Two types of medicine are commonly used:
A local anaesthetic drug
A strong pain relieving medicine, such as fentanyl
Who looks after the epidural?
The nurses on the children’s ward are trained to look after epidurals.
Your child will need to have frequent checks of their heart rate, oxygen levels & blood pressure.
The nurse will also check how well the epidural is working by asking your child about their pain, using a cold spray and asking them to move their legs and wiggle their toes.
The pain clinical nurse specialists or an anaesthetist will review your child every day.
Common side-effects
All strong pain relieving medicines can produce side effects.
Heavy, numb or wobbly legs
It is common for your child to have heavy, numb or wobbly legs whilst receiving an epidural. Normal feeling will return when the epidural is reduced or stopped.
Unable to pass urine (wee)
Your child will have a small tube (urinary catheter) passed into their bladder whilst they are asleep to help them pass urine. This catheter will stay in until the epidural is removed.
Itchiness, feeling sick or vomiting
Some children experience itching, nausea (feeling sick) or vomiting due to the strong pain killer used in the epidural. Medicines can be given to reduce symptoms.
Headache
It is common for your child to get a headache after any operation. Sometimes an epidural can cause a severe headache, which is worse when sitting up. Please let the pain team know if your child experiences severe headache after an epidural.
Pain
Your child will be given additional pain medications to prevent pain alongside the epidural.
Complications
Your anaesthetist will have discussed with you that the benefits of your child having an epidural are much greater than the risk of complications occurring.
Slow breathing
Slow breathing is an uncommon complication of epidural and can be treated.
Nerve damage
Nerve damage can give a loss of feeling or movement in an area of the body. In most people this gets better within a few days, weeks or months. Permanent nerve damage by the needle or catheter is extremely rare.
Epidural catheter infection
Rarely an infection can develop around the epidural catheter. If any problems occur your child’s epidural will be removed. Very rarely, an infection can develop within the space around the spinal cord. This may be treated with antibiotics and your child closely monitored.
Stopping the epidural
Most children have an epidural for 1–3 days after their operation.
The pain and surgical teams will decide together when the epidural should be stopped. Removing the epidural is not painful. We use glue remover to make the dressing less sticky and then gently pull out the tube.
Your child will need to continue to take pain killers by mouth after the epidural is removed to prevent pain.
Going home after an epidural
After 24 hours the plaster covering the epidural site can be removed. You will need to be reviewed urgently by your GP, or in A&E if your child:
Has any signs of redness, swelling or discharge from the epidural site
Develops new or worsening back pain
Feels that their legs are numb or weak, or they are not able to stand and walk as usual
Is not able to hold in their wee or poo, when they are usually able to
Feels unwell with a high temperature
Please tell the nurse or doctor that your child has recently had an epidural.
Located on the third floor in the East Wing of the main hospital. To gain access please use the lifts next to bloods tests and the restaurant.
Daily Ward Structure
Meal Times
All children will be supplied with 3 meals during the day. We will also supply breastfeeding mother’s with three meals a day. Breakfast will be served to you at your bed space. Lunch and dinner orders will be taken during in the morning. At lunch and dinner time you will hear a bell that is rung. When the bell is rung, you will need to go to the kitchen to collect your child’s order by stating the bed number you are in.
Also, on the ground floor you will find M&S, WH Smiths, Costa, Our Restaurant and Subway.
Visiting
We only allow two people by the bed space at one time due to safety reasons.
Siblings are allowed to visit. Both parents can be present throughout the day but only one can stay overnight. The parent who is not staying overnight must leave by 22:00 and can return at 08:00.
Any questions please speak with the nurse in charge.
Doctor's
Doctors will come onto the ward between 09:00-10:00 and will start the ward round. Once your child has been seen they may not see you again until the next day. They may come around in the afternoon to check on how your child is doing but the nurse will report back to the doctors regularly. Doctors can be called if you are concerned. The doctors cover Starlight Ward, A&E and SCBU and sometimes they will get called away for emergencies.
Your child may not be under the paediatric team alone but also under the surgical, orthopaedic or ENT team. These doctors cover the whole hospital and do not stay on the ward. They will see your child once a day, but times may vary depending in the event of an emergency.
Facilities
Located by the kitchen is a parent’s room. In here you will find sofas, table and chairs that you can use to relax if you would like to. There is a fridge for you to use. All food must be labelled and dated otherwise it will get thrown away. This is checked daily. There is tea and coffee for you to help yourself and a microwave. Remember this is a communal space so please help us keep it tidy.
We have a playroom which is open Monday to Friday 09:30-16:30. The play team work Monday to Friday and wear a pink uniform. They will come around and help support your children during their admission and bring toys and games to the bedside. If you would like some toys over the weekend please speak with your allocated nurse.
Parking
You must be here for 48 hours before we can offer you any discount on parking. Parking is only discounted going forward and will not be backdated or refunded. Once you have been here 48 hours and will be staying longer, please speak with the nurse in charge who will give you a form in which will give you a discount.
We offer free overnight parking from admission, please speak with nurse in charge who will be able to help.
Extra Information
Please supply your own milk and nappies. We have a very small stock to help where required but do not rely on this. We supply towels and wash products and have multiples showers available to use. We as a Trust are not responsible for any lost or damaged personal property. Unfortunately, we do not have any spare clothes to donate due to infection control reasons.
If English is not your first language and would like to have an interrupter, please let us know so we can arrange one over the phone for you
If you are placed in a cubical this may be due to many reasons such as an infection risk and your child may need to stay in the cubical. Please speak with your allocated nurse if you have any questions. During your stay your child may no longer need to cubical and will be expected to move if asked to do so by the Nurses.
If you have any compliments or complaints please contact:
Sunshine Day Unit (WM)https://www.chelwest.nhs.uk/your-visit/patient-leaflets/paediatrics/sunshine-day-unit-wmuhhttps://www.chelwest.nhs.uk/++resource++plone-logo.svg
Coming into hospital can be stressful but we would like your stay to be as comfortable as possible. We hope this leaflet will be useful. Please read it carefully. Do not hesitate to ask staff any questions you may have.
Before coming to hospital
For your child to have their surgery he or she will not be able to eat prior to coming to hospital on the day of the operation.
If they take regular medication please give it at 6am unless you have been advised not to give the medication when they are seen in pre-assessment clinic
Your child must not eat food, drink milk or formula after 3am
If your child is breastfed, their last feed must be finished by 5am
Your child may drink small quantities of water up until 6:30am—do try and give at least one drink before 6:30am
Parents/carers
Parents or carers are welcome to come with their child. Please do not bring other family members into the hospital on this day, as there is simply no space to accommodate them.
Only one parent can accompany their child into the anaesthetic room, this is due to space restrictions.
Things to bring with you
Any medication your child is taking
A favourite toy or comforter
A cup or bottle for after the procedure
A special snack and drink for after the procedure
Comfortable clothing
Day cases
When having a day case procedure your child will be admitted to Sunshine Day Unit, which is located on the 3rd floor of the East Wing. Press the buzzer on the main door marked Starlight Inpatient Ward; the staff will direct you to Sunshine Day Unit.
Car parking
All visitors must pay for parking; a payment machine is located at the main entrance to the hospital.
On the day
When you arrive at Sunshine Day Unit the staff will check your child’s details. A nurse will show you to the playroom or bed area. You will briefly meet your child’s surgeon and anaesthetist.
You may have to wait a while before your child goes to theatre, during this time you are encouraged to spend time in the playroom until your child is ready to be taken to theatre. Children must be supervised at all times in the playroom.
Parent’s room
We have a parent’s room on the unit; there is a television, microwave, fridge and facilities to make a hot drink.
Valuables
Please do not bring any valuables with you. The hospital does not accept liability for any loss or damage to your personal property. If your child wears jewellery this should be removed and left at home. Also please remove any nail polish.
Eating facilities
The unit does not provide meals for parents and carers, there are a number of options:
Tea and coffee are available on the unit
Rumbles restaurant on the ground floor
The coffee shop in the main entrance
The hospital shop located in the main entrance
Shop and ward trolley, a service selling newspapers, sweets, crisps, fruit and minor items circulated the unit each morning
After surgery or procedure
After the child’s surgery or procedure they will be able to have something to eat and drink. Please wait until you have spoken to a nurse before offering them anything.
Going home
The doctor or nurse looking after your child will decide when your child can go home. This is usually at least two hours after the operation. This will vary for each child depending on what was done and their recovery time.
You will be given written information advising you on the after care and advising you on potential problems. If you require any medications please ensure you give them as the doctor instructed.
Before you come in to have your procedure we advise you have some pain relief available for home we recommend paracetamol and ibuprofen unless otherwise instructed.
Friends and family tests
You (or your child) will be asked to comment on your experience during your admission on the unit. This helps develop our service and ensure we are providing the standard of care you require. We appreciate your time to help us do this.
Oral morphine (Oramorph®) for children and young people to take homehttps://www.chelwest.nhs.uk/your-visit/patient-leaflets/paediatrics/oral-morphine-oramorph-r-for-children-and-young-people-to-take-homehttps://www.chelwest.nhs.uk/++resource++plone-logo.svg
This leaflet has been written for parents and carers about how to give morphine to their child at home. The information on this leaflet may be different from the information found with the medicine, because this is usually for adult patients. Keep this leaflet in a safe place so you can read it again.
What is morphine?
Morphine is a strong pain killer, used to treat moderate to severe pain in children after illness, injury or surgery.
When should I give morphine?
You should give your child morphine if they continue to have pain, despite having had their regular pain medicines (usually Paracetamol and Ibuprofen). Only give morphine when it is required, and only for pain.
How much morphine should I give?
Your doctor will work out the correct amount of morphine your child should be given. This will be written on the label—it is important that you only give the dose prescribed by your doctor. The dose can be repeated every four hours.
How should I give it?
Oral morphine (Oramorph®) is a liquid medicine. You should measure out the correct amount with the syringe or medicine spoon provided. It is important that you do not use a kitchen spoon as it will not give you the right amount.
When will morphine start working?
Your child should start to feel less pain within one hour of taking morphine.
What if my child is still in pain?
Make sure that your child has had their regular pain medicines, prescribed by your doctor (usually Paracetamol & Ibuprofen).
If, despite having had regular pain medicines and a dose of oral morphine your child is still in pain, contact your doctor.
What if I give too much?
If you think you have given your child too much morphine contact your doctor straight away.
If your child seems very sleepy, has problems with their breathing or stops breathing, your child may have had too much morphine—call an ambulance immediately.
Take the medication bottle with you, even if it is empty. It will be useful for the doctor to see.
Are there any side effects?
Most children taking morphine get constipated (difficulty doing a poo). You can help by encouraging your child to drink lots of fluids. Your doctor may also prescribe medicines that will help them go to the toilet.
Some children feel sick or are sick (vomit) when taking morphine. If this happens, contact your doctor who may prescribe a medicine to help.
Some children have difficulty passing urine (doing a wee) when taking morphine. Inform your doctor if this happens.
Your child may get headaches, a dry mouth, sweaty or skin flushing (red skin). They may also feel dizzy or lightheaded when standing.
Can other medicines be given at the same time?
You can give your child Paracetamol and Ibuprofen, unless your doctor has told you not to.
Check with your doctor or pharmacist before giving any other medicines to your child.
Where should I keep this medicine?
Keep this medicine in a cupboard away from heat and direct sunlight. Make sure that children cannot see it, or reach it.
How should I dispose of left over morphine?
Please take any leftover morphine to your local pharmacy, where they will dispose of it safely.
Do not share, or give the medication to anyone other than your child. The dose of morphine is calculated by weight; therefore it could be dangerous if you give the medication to anyone other than your child.
What happens if I run out?
We do not expect your child to need morphine for their pain for longer than 1–3 days. As the surgical site heals, your child’s pain will reduce and it is unlikely that they will continue to need strong pain killers like morphine.
If your child’s level of pain gets worse, or does not start to get better please contact your doctor.
Child Protection Medical Assessmenthttps://www.chelwest.nhs.uk/your-visit/patient-leaflets/paediatrics/child-protection-medical-assessmenthttps://www.chelwest.nhs.uk/++resource++plone-logo.svg
A medical examination has been requested as there have been concerns about the welfare of your child.
The examination will be carried out by a children’s doctor (Paediatrician) who experience in conducting such assessments.
The doctor will explain to you and your child what will happen.
The entire assessment should take around 1 to 1½ hours, but may be longer if we need to do assessments for more than one child.
What happens at the Child Protection Medical?
The doctor, with attending social worker will see you and your child in the Children’s Outpatient’s department. The doctor may want to speak to the social worker alone at the beginning of the appointment.
The doctor will then have a discussion with you about your child's current health, past medical history and development, and will conduct an examination of your child.
Discussions
As the doctor wants to know about the overall health of your child, you will be asked about:
Any illnesses or accidents your child has had
Their birth history
Development
Immunisations
Allergies
Any medication
Behaviour and progress at school
Their day to day health
Family history
Social history
What happens during the examination?
Your child will have a full general examination (top-to-toe). If your child has any obvious injuries these will be noted, measured and drawn in the child’s records.
The doctor may request for photographs to be taken of any marks or injuries seen on the child during the examination
More specific investigations such as blood tests, scans or X-rays may need to be done. These will be explained and discussed with you.
Your child will also be told that the examination can be stopped at any time if they/you wish.
What happens next?
The doctor will explain the findings of the assessment to you and your child (depending on your child’s age and understanding) as well as to the social worker.
The doctor will advise you if any further medical treatment is necessary.
The doctor will write a report which will be sent to your child's general practitioner, health visitor/school nurse, social worker and police officer (if police are involved).
A copy of the report will also be made available to you
What happens if you refuse to let your child be examined?
Usually a child's parent is asked for consent for the examination. If consent is not given and if the social worker and/or police feel an examination is in your child's best interest, they may need to discuss this further with you.
Sometimes young people may be able to give their own consent and the doctor will decide if this is possible.
We appreciate that having a child protection medical can be stressful for the family. It is important that:
You understand what is happening.
You and your child's views are listened to.
If required, you will be advised on the best way you and your child can be supported during this time.
The Cheyne Child Development Servicehttps://www.chelwest.nhs.uk/your-visit/patient-leaflets/paediatrics/the-cheyne-child-development-servicehttps://www.chelwest.nhs.uk/++resource++plone-logo.svg
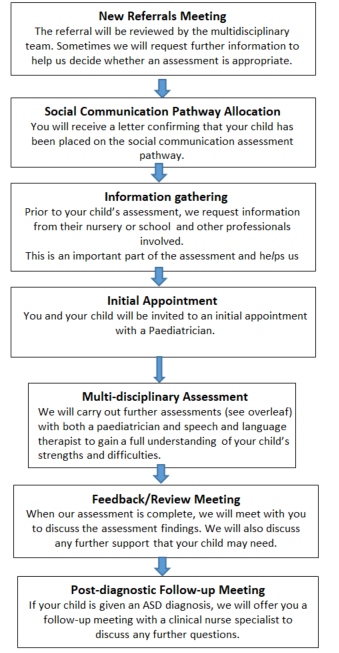
The SCD Pathway involves assessment, diagnosis, support and intervention for children referred to the Child Development Service who present with social communication difficulties. We hope to gain an understanding of your child’s strengths and difficulties across three areas: social interaction, social communication and social imagination.
Following the assessment, we will decide if a diagnosis of Autism Spectrum Disorder (ASD) will be useful in explaining your child’s pattern of difficulties.
What is Autism Spectrum Disorder (ASD)?
ASD is a developmental disability that affects how people perceive the world and interact with others. Individuals with ASD have difficulties with social interaction, social communication and social imagination.
For more information on ASD visit the National Autistic Society www.autism.org.uk
Why do I need to give consent?
We require consent to ensure that you understand and are happy with why we are assessing your child and what will happen during, and after, the assessment. We also seek consent for us to gain and share information with other agencies (e.g. school) that support you and your child, so we can understand your child’s strengths and difficulties across different contexts.
If you are unsure about giving consent, please contact us to discuss this further as this may impact on whether the assessment goes ahead.
What assessments may be completed on the SCD Pathway?
Families may be invited to a number of different appointments. We may also liaise with your child’s school/nursery to gain further information. Your child’s assessment will vary depending on their individual needs, which may include:
Developmental history: A structured interview with parents about your child asking questions about their birth, development and medical history focussing on communication and social interaction.
Structured Diagnostic Interview: A structured interview with parents which asks specific questions about your child’s social communication skills.
Speech and Language Therapy (SLT) assessment: An assessment of your child’s communication skills may be carried out through a variety of tasks and activities.
Autistic Diagnostic Observation Schedule (ADOS): A structured play and question-based assessment completed with your child.
Nursery Questionnaires: To gain additional information about your child within the school/nursery context we will ask a member of staff who knows your child well to complete a series of questionnaires about your child’s social communication, learning and behaviour.
Who is involved in assessing my child on the SCD Pathway?
Paediatrician: A team of Paediatricians with a special interest in Social Communication Disorders
Speech and Language therapist: A team of specialist Speech and Language Therapists experienced in the assessment of social communication difficulties.
Are any other agencies involved?
We will normally contact your child's school/ nursery and any other professionals involved in your child’s care. This helps us to get a fuller understanding of their strengths and difficulties across different settings.
Who should I contact for further information?
The SCD Pathway Coordinator is the main point of contact for all queries regarding appointment times, cancellations etc.
Cheyne SCD Coordinator: 020 3315 3153
What will happen after the assessment?
A report summarising the assessment findings will be sent out and shared with other agencies with your consent (e.g. Nursery).
We will refer your child to other services if required.
If your child receives a diagnosis of ASD you will be invited to our post-diagnosis support groups.
Support after discharge: Neonatal Community Outreach Teamhttps://www.chelwest.nhs.uk/your-visit/patient-leaflets/paediatrics/support-after-discharge-neonatal-community-outreach-teamhttps://www.chelwest.nhs.uk/++resource++plone-logo.svg
The Neonatal Community Outreach Team (NCOT) is split over two hospital sites – Chelsea & Westminster Hospital and West Middlesex Hospital – each hospital has their own NCOT, led by one Senior Neonatal Sister, who works cross-site.
Each member of the team is a Registered Nurse who has many years of experience in Neonatal Nursing. Our role is to make sure you feel well supported upon discharge and once your baby is at home.
Lead Nurse
Claire Salgin
Chelsea and Westminster team
Juliet Tyler
Andrea Sanchez-Sawicka
Isabel Loyola
West Middlesex team
Jamila Manna
Jennifer Maestrado
Both teams currently work 7 days a week, 9am–5pm.
Contact details
Chelsea and Westminster team
T: 020 3315 7882 M: 07833 285 833
West Middlesex team
M: 07585 128 598
The community team will offer support whilst you are on the unit and will offer teaching/advice on parent-craft and Basic Life Support. If you want to talk about anything to do with the process of your baby being discharged and what will happen leading up to it then they will come and see you to answer any questions and support you.
They support babies at home who require oxygen, weight management and nasogastric tube feeding.
You will be contacted by telephone within a few days of discharge to see how baby is settling at home. This gives you the opportunity to ask any initial questions that you may have. The team will continue to call regularly depending on your baby’s age, gestation and progress.
They also offer home visits, if required, to provide additional support. Your baby will be discharged from the community team usually within 4 weeks of being at home, and will then continue under the care of your health visitor.
Due to the vast area of Greater London, home visits will only be offered to those living in the local area of each hospital. If you are from outside of the local area, you will be supported by telephone consultation. If home visits would be potentially beneficial to you and your baby, we will discuss transfer/handover of care to your local hospital so full neonatal community support can be achieved.
Community midwife
If your baby has left the unit before 10 days of age you will be visited by your community midwife. They will weigh your baby and give advice on feeding, as well as checking up on how you are too.
Health visitor
Your community midwife will then hand over care to your health visitor who will carry out a first home visit. During this visit they will offer you advice and support on caring for your baby. Inform you of local baby clinics where you can go to get your baby weighed and local Children’s Centres who offer support groups. They will also offer advice on looking after yourself and how to get additional help if needed.
Your health visitor will make a plan with you if your baby is still small or premature to either visit more frequently or request for you to visit the baby clinic for check-ups.
You must register your baby with your GP as soon as possible
They will be your first point of contact for medical care; they carry out a 6-8 week post-natal check for you and your baby. If your baby was premature it may be carried out at a later time. We will send your GP a copy of your baby’s discharge summary which will inform them of any medications or specialist milk your baby may need. Please contact them to arrange any repeat prescriptions.
If you are concerned about your baby out of hours, please call 111, or call 999 if it is an emergency.
Follow-ups after discharge
Some babies might require a Paediatric Consultant appointment or other follow up tests or exams. You will be informed prior to, or on the day of discharge if there are any appointments scheduled for your baby. Otherwise, they will be arranged by post or by telephone call.
Should you have any queries with regard to your baby’s appointment, please telephone the number on your appointment letter or alternatively call Paediatric Outpatients on 020 3315 6666. We are unable to reschedule appointments for you.
Home parenteral nutrition for childrenhttps://www.chelwest.nhs.uk/your-visit/patient-leaflets/paediatrics/home-parenteral-nutrition-for-childrenhttps://www.chelwest.nhs.uk/++resource++plone-logo.svg
Your child has been diagnosed with Intestinal Failure and therefore requires Home Parenteral Nutrition (HPN), to meet their nutritional needs. There are many condition’s that can lead to Intestinal Failure, your child’s diagnosis will be discussed and explained to you by the Nutrition Team.
Drs Fell, Epstein and Thangarajah- Consultant Paediatric Gastroenterologists
Mr Simon Clarke- Consultant Paediatric Surgeon
Lisa Davey- Clinical Nurse Specialist Paediatric IBD
Jackie Falconer and Bonnie Samani- Specialist Paediatric GI Dieticians
Simone Hunt- Mercury Ward Manager
Mercury Ward Nurses
Amy and Gitta- Play team
Samanthi Perera-Gill- Clinical Psychologist
Drs Ben Roberton and Brahman D- Interventional Radiologists
Laura and Analou- Speech and Language Therapists
What Is Parenteral Nutrition (PN)?
Parenteral Nutrition (PN) is used when the digestive tract is unable to absorb enough fluid, energy and nutrients.
Parenteral Nutrition is delivered directly into the bloodstream, where the body can easily absorb and use it for energy, growth and development.
Parenteral Nutrition contains lots of ingredients:
Water – Sterile Water is used in PN to prevent dehydration.
Carbohydrates – These are the calories that provide the body with energy.
Fat (Lipids) – Are another source of calories and energy.
Protein (Nitrogen) – Is really important for growth and repair in the body. Protein also plays an important part in helping the body fight infection and the healing process
Vitamins – Each Vitamin has a different job to do in the body. They are essential in keeping the body healthy and to grow normally.
Minerals (Electrolytes) – The minerals that we talk about more often are Sodium, Potassium, Calcium, Phosphate and Magnesium. They help build a strong skeleton and are used by the nerves and muscles in our body.
Trace Elements – These are also minerals – but we don’t need as much of these in our body. They include Zinc, Copper, Magnesium and Selenium.
Everyone will have different nutritional requirements; therefore every child needs a different recipe. Every recipe (prescription) is calculated by the specialist nutrition team for your child. Once the prescription has been finalised, the PN is made in a compounding unit (a sterile environment) and will be delivered to you in bags that are ready to be used.
This prescription can change over time depending on your child’s growth, age and if they are managing to tolerate enteral/oral feeds.
How do we deliver PN into the blood stream?
Home Parenteral Nutrition is delivered into the blood stream via a Central Venous Line (CVL). A central venous line sits in a central vein, close to the heart. This allows for the PN to be administered and circulated into the body quickly and safely.
Central Venous Lines can be inserted in Interventional Radiology and sometimes in a theatre (surgery). The central line is inserted into a vein through an incision (small cut) made around the level of the collarbone. The tip (end) is threaded through and sits in a large vein that leads to the top of the heart.
The other end that you can see is tunnelled under the skin and comes out generally on the chest area – called the exit site. For all children this procedure is completed under a general anaesthetic.
Date Central Line Inserted:___________________
Central Line Size:___________________
Central Line Position:___________________
Central venous line safety
The central line has various parts which you need to recognise:
The Dacron Cuff – this should not normally be visible. This is a special sleeve which surrounds the line underneath the skin at the place where the line enters the chest (the exit site). The Dacron Cuff is made of a special material, which adheres to the tissue to prevent the line from falling out and helps to prevent infection. When the line is put in it may take some time for the Dacron Cuff to adhere to the tissue. If at any point you can see the Dacron Cuff this means that the line must have moved and will need to be checked before you use it.
The Dressing and Exit Site – the central line should always have a dressing to cover the exit site (where the central line leaves the body). Underneath the dressing the central line must always be positioned with at least one loop. Most of the time, the dressing will be occlusive (see through) so that you can see the exit site and the loop under the dressing. The dressing must be changed at least once a week.
The Clamp – is situated above the hub and is used as a safety device to prevent the flow of any fluid, air or blood into or out of the line. The clamp should be placed on the thicker reinforced area of the line. This is designed to stop the clamp from damaging the line itself. There may be times when you need to clamp the line close to your child’s chest – this will not be possible if your child has a multi lumen line, or if the clamp is faulty. You must ensure that your child’s emergency pack with disposable blue clamps is with you at all times.
The Hub – is the hard plastic portion at the end of the line, (usually red or white in colour), which is used to access the line. The Hub should always have a Bionector attached to it as a safety mechanism. When the line is not in use the Bionector should be covered with a port protector (Parafilm).
Bionectors - are ‘needle-less’, ‘closed – system’ devices. They enable you to access the central line, without ever exposing the inside of it. A Bionector can be used to give drugs or flushes by bolus or infusion or in order to take blood. A Bionector has a built in valve, which remains closed unless you attach a syringe or giving set to it. A Bionector must be changed once a week, for this reason many people choose to do this after they have completed the weekly central line dressing.
The Port Protector – a disposable passive disinfection device. This is used to reduce central line infections by keeping the Bionector clean when not in use. This is disposable – every time the central line is disconnected a new device is used. If the line is not in use they can remain in situ for seven days.
Name and size of the dressing you/your child is using:________________________
Central line safety advice including daily care and observations
Infection
Central Venous Line Infections are one of the most serious and potentially life threatening complications that can happen. As well as the most serious, a central line infection is one of the most frequent complications that we see. It is therefore essential that all precautions are taken to try and reduce and eradicate the chance of infection.
Please note that if your child develops a temperature of 38degrees and above you should do to your local hospital immediately as your child could have a line infection or sepsis.
If worried or unsure please ring 999 and ask for an ambulance to take you to your local hospital.
Observe the exit site and neck wound for any signs of infection;
Redness
Swelling
Pain
Heat
Discharge i.e. blood/pus
Should any of the above occur please take your child to their local hospital or call your community nurse for assessment. Your child will require an assessment, swabs and blood specimens to be taken.
If the central line is infected then it will need prompt treatment.
If the dressing is soiled with blood or there is wetness under the dressing it will need to be changed as this increases the risk of infection.
If the dressing remains intact and there is no oozing then the dressing needs to be changed once a week by the children’s’ community team.
When can I given paracetamol to my child?
Never give Paracetamol to treat a temperature. You may want to give Paracetamol/Calpol as pain relief. If using Paracetamol to treat pain, please do not give it for two hours before the PN starts and for two hours after it has started OR within two hours of the PN completion and for two after the PN has been disconnected. These are the times that are higher risk and therefore we do not want to hide a temperature. If you are ever unsure, please just call us to check.
Emergency central line care
Prevention
Always ensure that your child’s dressing is secure and intact.
The dressing must include a loop in the central venous line.
Ensure that the clamp is closed when the infusion has been discontinued.
Observe the central line site for any signs of infection (red, pus, swelling, bleeding and broken skin). Any concerns please contact the nutrition team.
Ensure that the Bionector is secure and in place. If the Bionector is missing you must replace this as a matter of urgency but with the correct technique. Never replace the dirty Bionector.
Ensure that the port protector is in situ if the infusion has stopped.
Always check your child’s central line and dressing is intact prior to leaving the home. Depending on the age of your child, they must also participate in these checks.
Always ensure that you have an Emergency Central Line pack and a copy of the Hand Held letter with you at all times.
Problem
Possible Cause
Action
Prevention
Leak of blood and/or PN from Central Line
Hole in the line
If the PN is running, this needs to be stopped.
If you can see the hole, wrap the area in sterile gauze and clamp just above the hole. Use the second clamp in the emergency pack to clamp as close to the dressing as possible (wrapping the clamp area with gauze).
If you cannot see a hole, use both clamps and clamp using gauze, as close as you can to the dressing edge.
Contact C&W and attend A&E.
Good dressing and securement techniques.
Use of ambulatory pumps.
Risk assessment for environmental hazards
Central Line break
Central line has snapped in half due to repair or accident.
If the PN is running, this needs to be stopped.
If the clamp belonging to line remains in place – ensure it is clamped.
Kink the end of the line, wrap in gauze and clamp the kink. Place the second clamp in the emergency pack at the edge of the dressing (using gauze) Contact C&W and attend A&E.
Good dressing and securement techniques.
Use of ambulatory pumps.
Risk assessment for environmental hazards.
After two breaks in the central line, a planned elective replacement will be organised.
Redness, swelling, tenderness, pus or bleeding at the exit site.
Possible site infection
Contact the Nutrition team at C&W or Community Nursing Team. Swabs will be taken, topical treatment commenced and dressing technique changed to daily.
Aseptic non touch technique.
Weekly dressing changes. Quick recognition and treatment.
Trauma, missing loop in the central line dressing, Dacron cuff visible externally
Central line has been dislodged
If the PN is running, this needs to be stopped. Leave the dressing in place. Take the long length of the central line and wrap above the exit site, on top of the dressing. Cover the bundle of line in gauze and secure with tape (all in the emergency kit) Contact C&W and attend A&E.
Good dressing and securement techniques.
Use of ambulatory pumps.
Risk assessment for environmental hazards.
Central line has been accidentally removed
Central line has been completely removed.
Sit the child on your lap or next to you on a chair. Take the sterile gauze from the emergency pack, fold into four and place on the hole that the line came out from and apply pressure. Call 999 (remembering to state a central venous line has been pulled out). Keep applying new gauze when soaked with blood – NEVER remove the original placed gauze (this may remove and mechanism of blood clotting and increase bleeding). Try not to move the child – this may increase bleeding.
Good dressing and securement techniques.
Use of ambulatory pumps.
Risk assessment for environmental hazards.
Chest Pain. Shortness of Breath.
Possible Air Embolism
Place the child onto their left hand side (if this is proving hard – cuddle them across your lap onto the left side – aiding reassurance. Call 999 remembering to state the symptoms and that the child has a central venous line.
Ensure the Bionector is in situ at all times. Ensure the clamp is secure. Ensure all air is removed for syringes and giving sets prior to use.
Feeling Unwell
Possible Central Line Infection
Follow the sepsis protocol.
Aseptic non touch technique
If you have needed to discontinue the PN mid infusion, remember there is a risk of low blood sugar. If your child receives an enteral feed continue or commence this. Encourage them to have a drink or eat what they can within their diet.
In an emergency, it is essential that you attend the nearest A&E – remembering to take your Hand Held letter. Let the Nutrition team know when and where you have been admitted.
You will be provided with a safety pack containing the following items:
1 x pack sterile gauze
1 x large IV 3000 dressing
1 x small IV 3000
2 x blue clamps
2 x bionectors
4 x sani cloth CHG 2%
1 x roll transpore
The safety kit should accompany the child at all times, anyone caring for the child must be familiar with the pack and must have received safety training.
Your home and parenteral nutrition
All patients that are discharged home with Parenteral Nutrition must have a home assessment. This is a national requirement to ensure that the environment is safe and that you have all that you will need before going home. We will help you decide where the connection/disconnection and care procedures would be best carried out and the options for storage of the ancillaries and equipment including a dedicated fridge.
Sometimes your home may need some rearranging – we can help to advise on this. For some people we need to explore housing options if the home does not have the capacity for a patient on home parenteral nutrition.
Yes/Comment
No/Comment
Adequate space for setting up HPN
Adequate space for PN fridge- normal standard long fridge
Adequate space for storage consumables – trolley, IV stand, Boxes e.t.c
Number of steps into property
Number of steps to bedroom
Number of steps to location of fridge
Close located hand washing sink
Number power sockets
Heating/Ventilation
Cleanliness
Pets
Number of rooms
Number of people living in the property
Own home
Home care companies and the National Home Parenteral Nutrition (HPN) framework.
The national HPN framework was commissioned by NHS England to improve standards and access to home parenteral nutrition services for adults and children in England. Only companies who have formally applied to be on the framework and have demonstrated they meet the specified standards are authorised to provide homecare.
The National Framework Agreement for the Supply of Home Parenteral Nutrition for England (or framework for short) covers all aspects of home parenteral nutrition, including the making and delivery of the feed and ancillaries, and the provision of specialist nursing for those not able to administer the feed themselves. It was developed as part of a national tender commissioned via NHS England and the Commercial Medicines Unit of the Department of Health.
When your child is nearly ready for discharge, the chosen home care company will conduct an installation visit to deliver and set up the larger pieces of equipment (including the fridge) and ancillaries. Once you are at home, the company will deliver your child’s PN – this is generally on a weekly or fortnightly basis depending upon the prescription. They will also deliver supplies of ancillaries – they will call you prior to a delivery to ask what you need.
The company will discuss your delivery day and time – you will be allocated a two hour delivery time slot. It is essential that someone is at home or that you have made, the necessary arrangements for someone to let the delivery driver in – the PN must be unpacked straight into the fridge.
You will be given contact details for your co-ordinator including an out of hour’s emergency telephone number.
If at any time you are unhappy with the home care company, please call us to chat through any concerns/problems.
Your Home Care Company is called _____________________________________
The contact number for your Home Care Company is ________________________
Your patient care co-ordinator is _________________________________________
How to store parenteral nutrition at home
The chosen home care company will deliver all of the equipment that you require for storing and administering Parenteral Nutrition in the home, during the installation visit.
You will be provided with a dedicated fridge to store the Parenteral Nutrition. This fridge will come equipped with a thermometer, so that you can monitor the storage temperature.
The fridge MUST only ever be used to store the Parenteral Nutrition and for some people the central line locks. This fridge MUST never store food products or medicines that are given orally or enterally. This is also true if you go on holiday.
The Parenteral nutrition bags must be stored in single layers on each shelf (no stacking)
Make sure that the Parenteral Nutrition bags do not touch the back wall of the fridge; this may cause them to freeze. You must never use Parenteral Nutrition that has frozen. If this happens please contact the home care company and the hospital team.
The temperature of the fridge should always be maintained between 2 - 8 degrees Celsius.
If you are worried that your fridge is not working as it should do, please contact the Home Care Company.
If the PN has not been stored at the correct temperature you must not use these bags. Please contact the Home Care Company for further PN. If you have no PN to use that night please use the emergency plan. You can also contact the Chelsea and Westminster Nutrition Team for children for advice.
Prior to commencing parenteral nutrition
You will need to remove the bag of parenteral nutrition from your fridge 4-6 hours before the infusion may begin.
The best place to keep it until the infusion time is to hang it from your drip stand or lie on a flat surface to warm up.
It must not be in direct heat (next to radiators etc.) or sunlight.
Check that the correct name is printed on the PN label and that it is within its expiry date. (If any information is incorrect – contact your home care company and the nutrition team at C&W
If you have a protective bag, ensure that this is used to cover the PN and protect it.
Look at the bag carefully for signs of damage and/or leaks.
Inspect the bag to ensure that there are no particles of cloudy areas. If you are infusing a Vamin bag, this should be a clear yellow colour. If you are infusing a fat bag, this should be a white colour. If you are worried about your PN please contact the home care company and the nutrition team at Chelsea and Westminster.
If the bag of parenteral nutrition does not meet your safety checks, start the checking procedure on another bag. Inform your home care company and the nutrition team at Chelsea and Westminster.
Troubleshooting PN administration
Problem
Possible Cause
Action
Prevention
Unable to flush line or line is becoming stiff
Line partially or fully blocked.
Check for kinks in the line.
Check that the line is not clamped.
Check that the clamp site is rotated and has not become stiff.
Change the needle free device.
Contact the nutrition team at Chelsea and Westminster if not resolved. If outside of hours seek emergency help
Flushing the central line as soon as the PN has finished. NOT leaving the infusion on KVO.
Using the push/pause technique when flushing the central line.
Feeling Unwell +/- temperature.
Possible central line sepsis.
Follow the sepsis protocol.
Follow the rules of Asepsis.
Pump Malfunction
Malfunction / damage
Use your second back up pump.
Contact the 24hr helpline to arrange collection and replacement.
Follow pump care instructions.
Keep an eye out for the maintenance date – if you see that this is out of date, contact the homecare company.
Air in line
Pump malfunction. Air In giving set.
Clamp the central line and stop infusion.
Check the line for any air.
If no visible air, change the pump and use your back up pump (you can do this without disconnecting).
If there is air in the line, prepare your equipment, disconnect and replace with buffer PN bag. If you are concerned that it is a pump malfunction use your backup pump.
When you remove the PN bag from the fridge, hang it up-right from the stand rather than laid flat.
Ensure that there is no air in line before you connect.
No PN available to infuse
PN bag spoiled during prep.
PN bag leaking.
PN bag failed your safety checks.
Fridge malfunction
No PN delivered
Prepare and Infuse PN Buffer bags**.
Use the same infusion volume and ramp up/down times.
Notify the Nutrition team at C&W
Ensure correct procedure used to connect PN.
Remember to refer to your emergency central line training.
** PN buffer bags are delivered on an as and when basis. You will be delivered a spare lipid and aqueous bag. If you have used this buffer bag please contact us and your HPN coordinate to arrange delivery of more.
Flushing a central line
The central line must be flushed before any PN is administered, to prevent the mixing of incompatible medicines/mixtures and always at the end of the infusion, to maintain patency (preventing blockages).
The central line is flushed by using a prefilled 10ml syringe of 0.9% Saline. We use a technique called the push/pause technique – this helps to clear the tube of any debris and maintain patency.
If the central line is no longer in use, you must flush it once a week.
Locking a central line
Locking a central line is defined as the flush that you lock in the line at the end of the PN infusion (the last flush before clamping and securing the line).
There are a variety of locks. The lock that you use may change over time. A change of line lock will be discussed with you in hospital or in a clinic appointment.
Types of line locks
Hepsal – this is a solution of Heparinised Saline (10IU/ml). Heparin is used to dissolve blood clots. It is thought to help maintain central line patency. This is often used more commonly with our PICC lines due to the smaller size lumen.
Taurolock - The lock solution contains (cyclo)-taurolidine and citrate (4%). (Cyclo)-taurolidine has a broad antimicrobial activity against gram-positive and gram-negative bacteria and fungi. It is thought that locking Taurolock in the line will prevent the formation of bacteria biofilm. Taurolock is used after sepsis episodes.
Antibiotic locks – An antibiotic lock contains a small amount of an antiobiotic (amikacin, vancomycin, gentamicin). An Antibiotic lock is commonly used in the under 5s that seem to experience common bacterial central line sepsis episodes. The Antibiotic lock is not a long term lock.
Flushing solution on discharge - __________________________________
Lock solution on discharge - _____________________________________
Aseptic handwashing
Handwashing and hand hygiene are one most important procedure when looking after someone with a central line.
Before washing your hands remember:
Nails should be short and well kept
It is advisable not to wear nail varnish (if you are wearing nail varnish it should not be chipped or flaky)
Remove rings with stones or ridges on
Remove watches and bracelets
Roll up long sleeves (wrists must be clear off all clothing).
This should last at least 2 minutes.
After washing your hands remember:
Always rinse from your fingers towards the elbows (so that the dirty water is moving away from your hands)
Dry your hands with paper towels
Do not turn off the taps with your clean hands (use your elbows or a paper towel to turn them off)
PN administration technique and CVL care
Procedure for connecting TPN
(All procedures are based on the BAPEN Parenteral Support Catheter Guidelines 2018)
Key Principles of Care Management of Central Venous Catheters:
Identify the key parts
Ensure no touching of any key parts during the procedure
Apply alcohol hand rub directly to hands during the procedure if touching any non-sterile contents and/or if there is any risk of contamination
Social handwash
Step 1 - Gather and check equipment
Bag of parenteral nutrition (PN) (Check PN prescription, integrity of bag & expiry date).
Trolley/tray.
Detergent wipes (or paper towel, soap and water).
2% CHG & 70% IPA disinfectant wipes.
Sterile dressing-pack.
Sterile gloves.
10mL pre-filled syringe(s) 0.9% Sodium Chloride for Injection.
Alcohol hand rub
Sterile intravenous giving set.
Infusion pump, stand/rucksack.
Step 2 - Aseptic handwash
Step 3 - Prepare equipment
Clean & disinfect trolley/tray surface.
Open sterile dressing pack/towel onto trolley/tray surface to create an aseptic field.
Open equipment needed onto aseptic field.
Wearing sterile gloves spike bag of PN and prime giving set.
Programme pump.
Step 4 - Prepare patient and catheter
Open sterile towel & place under catheter.
Remove any outer dressing covering the catheter (if used) & port protector.
Step 5 - Access catheter
Put on sterile gloves.
Prime pre-filled syringe.
Disinfect the Bionector (15 seconds using friction).
Attach syringe to the Bionector and flush catheter using push pause flushing and positive pressure clamping technique.
Attach giving set.
Step 6 – Start infusion and secure catheter
Ensure giving set & catheter clamps are released.
Start infusion at prescribed rate.
Remove gloves.
Secure catheter.
Clear away and social handwash—PN administration technique and CVL Care
Procedure for Disconnecting TPN
(All procedures are based on the BAPEN Parenteral Support Catheter Guidelines 2018)
Key Principles of Care and Management of Central Venous Catheters:
Identify the key parts
Ensure no touching of any key parts during the procedure
Apply alcohol hand rub directly to hands during the procedure if touching any non-sterile contents and/or if there is any risk of contamination
Social Hand wash
Step 1 - Gather and check equipment
Trolley/tray
Detergent wipes (or paper towel, soap and water)
2% CHG & 70% IPA disinfectant wipes
Sterile dressing-pack
Gloves
10mL pre-filled syringe(s) 0.9% Sodium Chloride for Injection
10ml syringe and filtered needle
Taurolock locking agent
Alcohol hand rub
Parafilm
Sharps bin
Step 2 - Aseptic handwash
Step 3 - prepare equipment
Clean & disinfect trolley/tray surface
Open sterile dressing pack/towel onto trolley/tray surface to create an aseptic field
Open equipment needed onto aseptic field
Step 4 - Prepare patient and catheter
Switch off pump and close clamp on giving set
Clamp catheter
Step 5 – Draw up locking agent
Put on gloves
Attach needle to 10ml syringe
Carefully open up Taurolock ampule (check for expiry date)
Draw up 0.8mls of Taurolock and remove needle, place back on trolley
Remove gloves and clean hands
Step 6 - Access catheter
Put on gloves
Disconnect giving set from needle-free device
Disinfect needle free device
Prime pre-filled syringe(s)
Attach syringe(s) to needle-free device and flush catheter using push pause flushing and positive pressure clamping technique
Disconnect syringe and attaché syringe with locking agent. Instil into lumen and clamp under positive pressure
Attach Parafilm
Step 7 - Secure catheter
Remove gloves
Secure catheter
Clear away and social handwash—changing catheter dressing
This procedure should not be incorporated into any other procedure in which the catheter hub is manipulated so keeping the risk of cross contamination to a minimum. Dressings need to be changed every 7 days, if they are soiled or have become loose.
A fabric island type dressing is recommended if there is discharge/infection from the exit site – this will be changed more frequently on advice from the nutrition team.
Social handwash
Step 1 - Gather and check expiry dates of equipment
Trolley/tray.
Detergent wipes (or paper towel, soap and water).
2% CHG & 70% IPA disinfectant wipes.
Sterile dressing-pack.
Sterile Gloves.
Single use 2% CHG & 70% IPA sponge applicator(s).
Sterile dressing(s) of choice.
Alcohol hand rub.
Step 2 - Aseptic handwash
Step 3 - Prepare equipment
Clean & disinfect trolley/tray surface.
Open sterile pack/towel and create an aseptic field.
Open equipment needed onto aseptic field.
Step 4 - Prepare patient and catheter
Remove existing dressing(s) with apeel
Step 5 - Access catheter
Put on sterile gloves.
Disinfect skin with single-use 2% CHG & 70% IPA sponge applicators (using one for the site and the second for the wider skin area (if the line itself is soiled a third is required to clean the line).
Apply dressing with a secure loop.
Step 6 - Secure catheter
Remove gloves.
Secure catheter (as recommended by HPN Centre).
Clear away and social hand wash—Changing Bionector
A Bionector must be changed once a week, for this reason many people choose to do this after they have completed the weekly central line dressing.
Social handwash
Step 1 - Gather and check expiry dates of equipment
Trolley/tray.
Detergent wipes.
2% CHG & 70% IPA disinfectant wipes.
Sterile dressing-pack.
Sterile Gloves.
Bionector.
Port Protector.
Alcohol hand rub.
Step 2 - Aseptic handwash
Step 3 - Prepare equipment
Clean & disinfect trolley/tray surface.
Open sterile pack/towel and create an aseptic field.
Open equipment needed onto aseptic field.
Step 4 - Prepare patient and catheter
Open sterile dressing towel and place under catheter.
Step 5 - Access catheter
Put on sterile gloves.
Disinfect (15 seconds using friction) Bionector.
Remove Bionector.
Disinfect the outside of the hub only.
Replace Bionector swiftly.
Fasten port protector.
Step 6 - Secure catheter
Remove gloves.
Secure catheter.
Clear away and social hand wash—additional activities
Baths/showers
When bathing and showering we would recommend covering the central line dressing – or minimising how wet it gets. If the dressing becomes wet or dislodged during bathing, it must be changed when out of the bath/shower and dry. If bath water is contaminated with poo, please change the Bionector and port protector (if they get wet). If the dressing and central line gets wet during bath time please change dressing immediately.
Swimming
We do not advise letting the central line being submerged and therefore do not recommend swimming in any circumstance
Pets
Pets can be great companions. If you do keep pets in the home it is essential that no Pets are allowed in the child’s bedroom or in the area that the PN procedures are undertaken.
Please always discuss pets with the Nutrition team.
Holidays
Holidays and short breaks are great for families and we like to support these when we can. If you require a change in delivery address or days, you need to give your home care company at least 6 weeks’ notice. The home care company will deliver to any address in the UK and to any port. The PN will be packaged and documents provided for flights and overseas travel.
It is your responsibility, to source a fridge that can be used, as a dedicated PN fridge at your holiday destination.
If you are planning on travelling abroad, it is important that you discuss your travel plans with the Nutrition team before booking. It is important to think about the temperature/heat of your destination, the health care service provision and travel time.
We will provide you with a letter documenting the equipment that you require for travel and a fit to travel document. These documents can only be provided once your plans have been discussed and within a month pre travel.
It is always essential that you have travel insurance for overseas travel.
Remember your hand held letter.
School (training and support)
We will provide or help organise the necessary training for places of education. Depending upon the age and needs of your child, we will provide documents to support an Education Health Care Plan and extra support at school.
Please let us know as soon as you are notified with your child’s school placement, so that we can make contact and start arrangements. If you plan on changing schools please let us know as soon as possible to avoid delays.
Care packages
Continuing care will be discussed prior to your discharge. We will always refer and provide supporting statements for this process.
Children with Disability Teams can be very helpful in some circumstances. Referrals will always be discussed.
Some hospices provide respite and care packages for children requiring PN; we will discuss this as part of the discharge process. Please do not hesitate to contact us for further information.
Activity opportunities
Over the wall is a residential camp facility – an amazing opportunity for young people to take part in a wide range of activities in a safe environment with health professionals to provide care needs. https://www.otw.org.uk/
Please ask the nutrition team for more information.
Home parenteral nutrition training programme
Name of Patient:__________________________
Patient Hosp Number:__________________________
Patient D.O.B:__________________________
Parent/Carer Name:__________________________
Aim: The patient/carer will acquire the knowledge and skills necessary to safely and effectively administer parenteral nutrition and care for the central venous catheter (line).
Learning outcome
COMPETENT
SIGN and DATE clearly.
1. To understand why PN is required
a. Principles of normal intestinal function
b. How gut function has changed
c. Understands the potential side effects and complications of PN and can explain how to manage such side effects.
2. To understand principles of asepsis
a. Washes and dries hands effectively
b. Applies hand rub correctly
c. Applies gloves correctly
d. Prepares area demonstrating knowledge and understanding of ANTT procedure
e. Can identify key parts and non-key parts
f. Disinfects Bionector for minimum of 30 seconds with pressure and friction
3. To safely disconnect and flush line
a. Deals appropriately with pump and line at end of infusion
b. Prepares syringe with flushing solution correctly
c. Flushes line with push-pause technique
d. Uses positive pressure clamping technique when disconnecting syringe.
e. Prepares and instills line lock correctly (if applicable)
f. Applies port protector correctly
g. Secures line
4. To safely set up PN
a. Checks solution correctly
b. Primes giving set correctly
c. Checks patency of line before connecting infusion
d. Uses pump correctly including the correct programming (volume to be infused and hours of infusion including ramp up and ramp down)
e. Deals with pump alarms appropriately
f. Protects bag from light (where applicable)
g. Protects giving set/line connection during infusion (if applicable)
h. Can identify and describe the actions required if the PN is not available or if the PN or bag is spoilt or impaired (leaking, contaminated, separated)
5. How and when to dress exit site
a. Knows when to clean exit site
b. Knows what to clean exit site with and method of cleaning
c. Suitable dressings to use
d. Is able to assess and observe the exit site. Understands when and who to contact for advice.
6. How and when to change needle free connector
a. Knows how often the Bionector should be routinely changed
b. Knows any additional times connector should be changed
7. Emergency Pack
a. Can identify the key parts included in the emergency pack and where this should be kept.
b. Understands the importance of the hand held letter.
8. To detect possible infection
a. Can identity signs of possible bloodstream infection
b. Can identify signs of possible exit site/tunnel infection
c. Can demonstrate how to take a temperature using a tempodot device and can articulate when to seek medical attention
d. Can identify action to take and point of contact for above
9. To prevent air embolism
a. Knows how air can enter bloodstream and infusion
b. Knows when and how to clamp line
c. Knows how to deal with/prevent “air in line” during infusion
10. To act appropriately with blocked line
a. Knows signs of blockage
b. Can identify action to take and point of contact
11. To act appropriately with line fracture
a. Knows how lines can become fractured
b. Can identify signs of catheter fracture
c. Knows what to do in case of line fracture
d. Can identify point of contact
12. Can identify possible line malposition and accidental removal of the line.
a. Knows function of cuff and approximate location within skin tunnel
b. Understands implication of line malposition
c. Can identify actions and contact point required for a dislodged/malpositioned line.
d. Can identify actions and contact point required for a line that has been accidentally removed.
13. Can recognize signs of possible thrombosis
a. Can describe possible signs and symptoms of a central venous catheter related thrombosis
b. Can identify action to take and point of contact
14. Correct storage of PN, IV fluids
a. Can describe how to correctly store PN
b. Can read expiry date correctly
c. Understands about stock rotation
d. Understands importance of cleaning fridge
e. Can describe how to correctly store any IV fluids
f. Can describe how to safely dispose of any unused prescribed PN/IV fluids or other prescribed medication
15. Can identify signs of hypoglycaemia
a. Can recognize signs of hypoglycaemia
b. Can identify action to take and point of contact
c. Discuss actions to take to prevent a hypoglycaemic episode.
16. Lifestyle issues
a. Knows how to protect line during showering/bathing (as per hospital protocol)
b. Knows how to protect the line during swimming and the actions required when getting out of the pool (chlorinated only).
c. Pets/animal’s discussed with the patient and family
d. Holiday destinations and arrangements discussed.
e. Support in education environments discussed.
17. To know points of contact at
a. Discharging hospital
b. Homecare company
c. Children’s community nursing team
20. Knows about patient support group PINNT (Half)
Parent/carer home parenteral nutrition agreement
Name of Patient:__________________________
Patient Hosp Number:__________________________
Patient D.O.B:__________________________
Patient Consultant:__________________________
My child, ___________________________ has been prescribed Home Parenteral Nutrition (HPN).
I have undertaken the appropriate training for either the administration of HPN and emergency care or stand-alone emergency care. I have had the opportunity to discuss the cautions and risks associated with the use of HPN:
Central line sepsis and the risks associated with not recognising an infection quickly and acting appropriately (contacting and attending hospital). Any temperature 38 and above must be treated as a central line infection until proved otherwise.
Re-bound Hypoglycaemia
Parenteral Nutrition related Liver Disease and the importance of trophic feeds
Central Line problems and accidents (line displacement, line breakage or damage)
Central Line access problems (line blockages and replacements)
I have agreed to accept the responsibility and feel competent in the administration of home parenteral nutrition and emergency central line care.
I have agreed to accept the responsibility and feel competent in emergency central line care.
I have been given written guidelines to follow regarding my child’s treatment that I have understood. If I have any queries or do not understand any aspect of my child’s treatment, I will contact the CNS, the Ward, home care team or the on call registrar for advice.
Parent’s Name - Parents Signature –
Registered Nurse - Registered Nurse Signature –
Pharmacist Name - Pharmacist Signature –
Consultants Name - Consultant Signature –
Date -
Session
Supervisor
Date
Mother
Father
Comments
Aseptic Non-Touch Technique talk and demonstration
ANTT practice
Hand washing talk and demonstration
Hand washing practice
PN disconnection and flush talk, demonstration and practice
PN disconnection and flush practice
Hickman Line Safety Talk
PN connection and flush talk, practice and demonstration
The Cheyne Child Development Service - Pre-school Social Communication (SCD) Assessment Pathwayhttps://www.chelwest.nhs.uk/your-visit/patient-leaflets/paediatrics/the-cheyne-child-development-service-pre-school-social-communication-scd-assessment-pathwayhttps://www.chelwest.nhs.uk/++resource++plone-logo.svg
The SCD Pathway involves assessment, diagnosis, support and intervention for children referred to the Child Development Service who present with social communication difficulties. We hope to gain an understanding of your child’s strengths and difficulties across three areas: social interaction, social communication and social imagination. Following the assessment, we will decide if a diagnosis of Autism Spectrum Disorder (ASD) will be useful in explaining your child’s pattern of difficulties.
What is Autism Spectrum Disorder (ASD)?
ASD is a developmental disability that affects how people perceive the world and interact with others. Individuals with ASD have difficulties with social interaction, social communication and social imagination. For more information on ASD visit the National Autistic Society www.autism.org.uk
Why do I need to give consent?
We require consent to ensure that you understand and are happy with why we are assessing your child and what will happen during, and after, the assessment. We also seek consent for us to gain and share information with other agencies (e.g. school) that support you and your child, so we can understand your child’s strengths and difficulties across different contexts. If you are unsure about giving consent, please contact us to discuss this further as this may impact on whether the assessment goes ahead.
What assessments may be completed on the SCD Pathway?
Families may be invited to a number of different appointments. We may also liaise with your child’s school/nursery to gain further information. Your child’s assessment will vary depending on their individual needs, which may include:
Developmental history: A structured interview with parents about your child asking questions about their birth, development and medical history focussing on communication and social interaction.
Structured Diagnostic Interview: A structured interview with parents which ask specific questions about your child’s social communication skills.
Speech and Language Therapy (SLT) assessment: An assessment of your child’s communication skills may be carried out through a variety of tasks and activities.
Autistic Diagnostic Observation Schedule (ADOS): A structured play and question-based assessment completed with your child.
Nursery Questionnaires: To gain additional information about your child within the school/nursery context we will ask a member of staff who knows your child well to complete a series of questionnaires about your child’s social communication, learning and behaviour.
Who is involved in assessing my child on the SCD Pathway
Paediatrician: A team of Paediatricians with a special interest in Social Communication Disorders
Speech and Language therapist: A team of specialist Speech and Language Therapists experienced in the assessment of social communication difficulties.
Are any other agencies involved?
We will normally contact your child's school/ nursery and any other professionals involved in your child’s care. This helps us to get a fuller understanding of their strengths and difficulties across different settings.
Who should I contact for further information?
The SCD Pathway Coordinator is the main point of contact for all queries regarding appointment times, cancellations etc. Cheyne SCD Coordinator: 020 3315 3121
What will happen after the assessment?
A report summarising the assessment findings will be sent out and shared with other agencies with your consent (e.g. Nursery).
We will refer your child to other services if required.
If your child receives a diagnosis of ASD you will be invited to our post-diagnosis support groups.
What to expect when your child is referred for an Autism (ASD) assessment: